There are three ways in which you can relocate BxEngine:
- Only the BxEngine service
- Both the BxEngine service and database
- Only the BxEngine database
For BxSmartPrintPro there is only one way to relocate it:
- Always install the latest version from the partner portal.
⚠ License Validation Notice
To validate the license after it has been relocated you must notify us on support@bxsoftware.no so we can release the license, as it is locked to the previous server.
Before the license can be released, you must stop and disable the BxEngine and/or BxSmartPrintProService services in Windows on the old server.
Table of contents
1. Moving BxEngine
a. Moving Only The BxEngine Service
This method is used when only the application server is replaced, while the SQL server remains the same.
Steps:
1️⃣ Stop and disable the BxEngine service in Windows Services on the old server.
2️⃣ Download the latest BxEngine version from:
→ partner.bxsoftware.no/home (Downloads in the top right corner).
📧 Contact support@bxsoftware.no if you do not have access.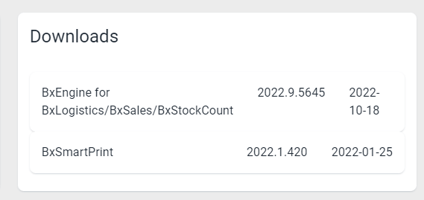
3️⃣ Install BxEngine on the new server:
- Run the .msi installer and complete the installation process.
4️⃣ Configure BxEngine:
- Open BxEngine Monitor.
- Wait for the Setup box to appear (this may take some time).
- Enter:
- License Key
- SQL Server Name
- BxEngine Database Name
- Database Username & Password
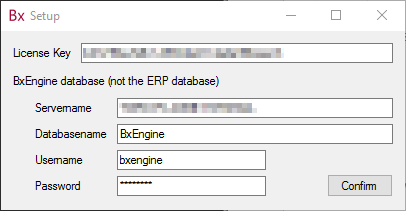
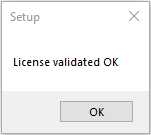
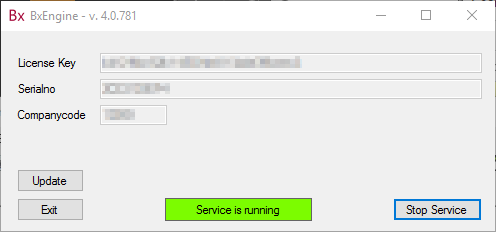
- Click Confirm and wait for License validated OK message.
- Click OK, wait 1 minute, then restart the BxEngine service.
✅ The system should now function normally.
b. Moving the BxEngine database
If you are transferring both the BxEngine application and SQL database, follow these steps:
Step 1: Backup the Database
1️⃣ Open SQL Server Management Studio (SSMS).
2️⃣ Right-click on the BxEngine database → Tasks → Back Up…
3️⃣ In the Backup dialog:
- Click OK to start the backup OR
- Change the backup location to C:\Temp\BxEngine.bak, then click OK.
4️⃣ Transfer the BxEngine.bak file to the new SQL server.


Step 2: Restore the Database
1️⃣ On the new SQL server, right-click Databases → Restore Database.
2️⃣ Select Device → … → Add → Locate BxEngine.bak → OK.
3️⃣ Under General, verify that Backup sets to restore is correct.
4️⃣ Under Files, enable Relocate all files to folder and check paths.
5️⃣ Click OK to restore the database.


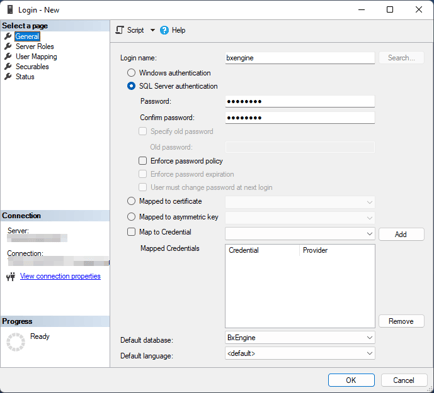
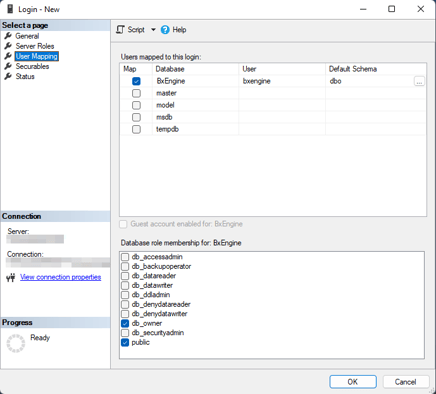
Step 3: Reset Database User
1️⃣ Delete the existing BxEngine user from the database.
2️⃣ Recreate the user with the same parameters as before.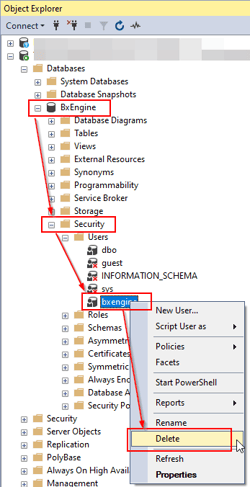
Step 4: Final Configurations
If you moved both the BxEngine service and database, follow section a to configure BxEngine.
If updating an existing BxEngine installation, delete (or edit) the BxEngine.ini file located at:
📂 C:\ProgramData\BxSoftware\BxEngine\Config
Then:
1️⃣ Open BxEngine Monitor.
2️⃣ Enter License Key + SQL details → Confirm → OK.
3️⃣ Wait for the Service to start, then restart it.
Step 5: Update SQL Connection in BxAdmin
1️⃣ Log in to BxAdmin.
2️⃣ Open Installation.
3️⃣ Double-click on the relevant Database connection fields.
4️⃣ Enter/update the new connection details and save.
5️⃣ Test SQL queries under SQL Integration to confirm functionality.
✅ Done! Your BxEngine transfer is complete.
2. Moving BxSmartPrintPro
Relocating BxSmartPrintPro is relatively straightforward:
Step 1: Stop the Service on the Old Server
1️⃣ Stop and disable the BxSmartPrintProService in Windows Services.
2️⃣ Notify support@bxsoftware.no to release the license.
Step 2: Install BxSmartPrintPro on the New Server
1️⃣ Follow the standard installation steps:
→ BxSmartPrintPro Installation Guide
Step 3: Install Print Queues
- Install the same print queues on the new server.
- Recommendation: Use the same printer names as on the old server to avoid reconfiguration.
Step 4: Copy Configuration Files
1️⃣ Close BxSmartPrintPro before transferring files.
2️⃣ Copy the following files from the old server to the new server:
- 📂 Configuration & printer settings:
C:\ProgramData\BxSoftware\BxSmartPrintPro\Config\Companies.iniC:\ProgramData\BxSoftware\BxSmartPrintPro\Config\PrinterFiles.ini - 📂 Label templates:
C:\ProgramData\BxSoftware\BxSmartPrintPro\Config\Labels - 📂 Logos/images for labels (if applicable).
- Update file paths in label templates if folder locations have changed.
Step 5: Restart BxSmartPrintPro
1️⃣ Start/restart BxSmartPrintProService.
2️⃣ The system should now work as expected.
✅ Done! Your BxSmartPrintPro transfer is complete.