Consignor OnPremises integration
Setup and configuration of Consignor integration with BxLogistics Pro
Consignor must be installed and configured correctly by a Consignor supplier before BxSoftware or you who are reading this can set up the integration between BxEngine and Consignor.
The user guide is updated consecutively as more parameters and ERP's are added.
Table of contents
- Preparations
- Setup - BxAdmin
- SQL Integration
- Setup - Consignor
- Setup - Terminals
- Setup - ERP specific
- Setup - Miscellaneous
Preparations
Installation
It is necessary that Consignor is ready before doing anything with the integration. Installation and necessary basic setup by Consignor will be conducted by a Consignor supplier. Printers must also be set up and, configured and completed in advance. The integration setup between BxEngine and Consignor must be done on a Consignor server, not a client. This is to avoid potential problems that can occur for example on a warehouse computer where the client is usually installed. Not all clients have the necessary access needed for the BxEngine ↔ Consignor integration. To see if you are on a Consignor client or server you can check within Consignor → Edit → Server connection, where you should find a server name. The server name is the correct server/PC to adjust the setup on.
Several companies/integrations?
If there are more than one company or integration involved on the same Consignor server, it might be a good idea to set up a separate Location or Actor within Consignor for the BxSoftware integration (If all three are engaged in Import Setup and Export Setup already, if not, filing it under Installation, Location or Actor is sufficient enough). This should be done with Consignor first. Our setup will normally not be compatible with other third party Import Setup and Export Setup setups. If the company already has its own Location, it is best to create a new Actor under Location so that you can gather everything related to that company in one place.
File area
Where to dump the files (BxEngine dump), where to read the files (Consignor reader) and later move them to (Consignor move)? As a standard we create i.ex only one folder like this:
C:\BxSoftware\Consignor\import\added, import is where the files get dumped to by BxEngine and is read by Consignor, and added is the folder Consignor moves the file to when reading it. If BxEngine is to dump files to a different computer, you have two options: Either set up BxEngine with a service user with access to the file area, or you can install BxSmartPrintPro there.
In cases where the file server is not on the BxEngine server network, BxSmartPrintPro must be installed as a proxy.
Network
If BxEngine and Consignor are installed on separate servers it is necessary that the servers can communicate with each other. This must be set up in advance by you or your IT department.
Delivery methods on a handheld terminal
You must figure out and decide which delivery methods you prefer to use from the terminal. I.ex if you are using Bring Business, over night, Schenker part load, Schenker groupage and so on. You can set this up in Consignor on a later occasion.
ERP System
In the ERP system you must prepare for which delivery methods to use/have available on the terminal. I.ex Bring Business parcel, Schenker groupage/part load and so on. As mentioned under "Delivery methods on a handheld terminal". This must be added in under delivery methods in the ERP system.
Control codes
Consignor demands control codes for part of the setup. The method of finding the correct control code you will receive from Consignor support, or from us if you are unfamiliar with this yourself.
Setup - BxAdmin
Configuration > Client config
The first thing you need to adjust is the setup under Configuration → Client Profiles
For On-premises this is required:
Area: consignor
enabled = true - Activates the Consignor integration.
offline = true - Must be activated for On-premises.
filepath = file path for the import folder.
Export to ERP > consignor
Now you can create an exporter under Export to ERP. Press New export -> Export type: consignor, Module: consignor, Action: create, Enabled: true, Update/enter key to save.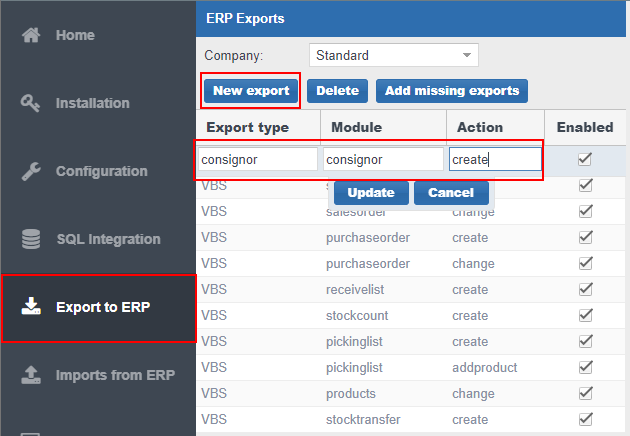
The next step will be to add Field mappings. This is standardized and you only need to press "Add missing defaults" to add all the current standard mappings. If it is desirable to add more mappings, you can do this at a later time with "New mapping". It must then be connected to the existing mapping that can be found under Import Setup in Consignor which will be further explained later. Note! Destination = 0 in Bx is F1 in Consignor, 21 is F22 in Consignor, so keep in mind when adding more than the standard number that our setup is one number in front of what has to be within Consignor.
Tracking number
If you in addition wish to report back the tracking number, you must adjust this under Client Profiles → Area: consignor:
exportfilepath = filepath for the export folder - See more under Export Setup.
waitforconsignor = time in seconds you set to wait for Consignor. 10-15 seconds should be enough, but on rare occasions up to 30 seconds may be necessary.
The next thing that needs adjusting is Export to ERP → pickinglist: create
SourceField = shipmenttrackingid, Destination = preferred field in the ERP system, Enabled: Yes.
Uni micro uses UP_IMPORTTRIGGER.tracknr for Destination, remember to display an extra column and activate the "Import just one line" column, as this is a parameter that needs to be activated per "UP_IMPORTTRIGGER" fields (In other words, applies only to the Uni integration).
Visma Global and Visma Business has no standard fields for this so it is up to the customer where it is preferable to add this number. For VismaNet there are standard mappings that must be activated in Export to ERP -> pickinglist create, this also requires that you add a packaging material type-ID from VismaNet on the box.ID static text mapping.
Price report return
It is also possible to report price back to the ERP system. Under Client Profiles → Area: consignor you must activate the same as for tracking number, exportfilepath and waitforconsignor.
For freight line: Add a product number for freight in freightproductno. If it is preferable to add a certain percentage to the price, one can also use freightcostfactor for this by adding for example 1.10 to add 10% to the freight price.
Export to ERP → pickinglist: addproduct → activate lines.price and potentially change the Destination field to the correct one in the ERP if you use something other than what is there as a standard.
Shipmentprice1 and shipmentprice2 can replace lines.price, as these are connected to Price1 and Price2 in Consignor. Lines.price is always Price1.
For freight price on the order header you only use shipmentprice1 and 2 in the sourcefield column under pickinglist: create exporter, and fill out the correct/preferred ERP field for the order header in the destination column. Here, it is also important that freightproductno is not filled out in Client Profiles: consignor, as this will lead to us trying to add an order line with shipping to the order. VismaNet has standard fields for this, you only need to activate the mapping in Export to ERP.
Show freight options on terminal
For delivery method/option to become visible on a handheld unit:
Area: pickinglist
deliverymethod = true
shipment = true
packagedetails = true - This is a set standard. Control options for size and weight per package.
Printproxy - dump files to other servers outside the nettwork
To dump Consignor files to another server if you for example do not have the opportunity for a direct connection between the ERP system and Consignor server:
Area: consignor
printproxy= xxxxx - Company code for BxSmartPrintPro.
printproxylicensekey= x-x-x-x - License key for BxSmartPrintPro.
SQL Integration
Delivery Methods
The query lies as standard under SQL Integration -> Pickinglist -> Delivery Methods. SQL columns are used like this: deliverymethod is the ID from ERP, deliverymethodname is the name from ERP - becomes visible on the terminal, externalid is the ID that we forward to Consignor, and equals the ID from ERP unless you wish to change it to a 0 if you do not want want us to trigger a print out from Consignor, typically a "Self pick-up" delivery option.
Here we added "case when <deliverymethod> = <deliverymethod-spesifikk_id> then 0 else <deliverymethod> end externalid".
If you do not need the self pick-up option then "<deliverymethod> as externalid" is enough.
We also added "where <deliverymethod> in (1,2,3,and so on.)". This is added if you within the ERP system have more options than you wish to be available on the terminal. Let us say you only want "Self pick-up", "Bring Express" and "Schenker", but you have 10++ other options in addition that you do not wish to be displayed on the terminal - simply add "where <deliverymethod> in (1,2,3)" in the query where for example 1 is "Self pick-up", 2 is "Bring Express" and 3 is "Schenker".
For Visma Business there are also multiple language options for the different methods, it might be they are set up with the same ID. This will lead to duplicate options on the terminal. If so, activate "and lang = 47" to use the option connected to the Norwegian language (potentially a different ID related to preferred language).
Visma Business SQL

select
     txtno deliverymethod,
     txt deliverymethodname,
--     case -- disse tre linjene aktiveres med korrekt txtno nr
--     when txtno = 1 then 0 -- hvis det finnes et "henter selv" valg
--     else txtno end externalid
     txtno externalid
from
     txt
where
     txttp = 5
--   and lang = 47 -- enables for norsk språk hvis lev.metode nr dupliseres
--   and txtno in (1,2,3,4) -- enables med ønskede metoder knyttet til txtno
order by
     deliverymethodname
Visma Global SQL

select
     deliverymethodsno deliverymethod,
     name deliverymethodname,
--     case -- samme som forklart i Business spørring
--     when deliverymethodsno = 1 then 0
--     else deliverymethodsno end externalid
     deliverymethodsno externalid
from
     deliverymethods
--where
--     deliverymethodsno in (1,2,3)
order by
     deliverymethodname
Visma.net SQL (data hentes fra BxEngine databasen, importert fra Visma)

select
     deliverymethod,
     deliverymethodname,
     case
     when deliverymethod = 'HENTER SELV' then '0'
     else deliverymethod end externalid
from
     BxDeliverymethod
where
     deliverymethod in ('HENTER SELV','BRING','SCHENKER') --disse tre fraktvalg er eksempel
If there is no setup/table for freight in the ERP system, you can also use Union select per. freight option in our query. See the following example below.
select
     1 deliverymethod,
     'Henter selv' deliverymethodname,
     0 externalid
union
select
     2 deliverymethod,
     'Bring Express' deliverymethodname,
     2 externalid
union
select
     3 deliverymethod,
     'Schenker' deliverymethodname,
     3 externalid
Picking > Pickinglist
To make sure that all the necessary information like address, phone number and so on will appear on the labels from Consignor, you must add the missing fields in Picking → Pickinglist query.
These are the valid fields we send from terminal:
Consignee = our column names:
Number = customerno (customer number)
Name = delname (customer name)
Address1 = deladdress (delivery address 1)
Address2 = deladdress2 (delivery address 2)
PostCode = delpostcode (postal code)
City = delcity (city)
Country = delcountry (country)
Email = delmail (e-mail)
Mobile = delmobile (mobile phone number)
Phone = delphone (phone number)
Referanser = our column names:
Consignee = yourref (customer reference)
Consignor = delref (delivery reference)
If you wish to automatically add a set delivery method so that you do not have to choose from the BxMobile list, you can also add the column deliverymethods. Choose the ID of the delivery method from the DeliveryMethods query and add it in front to hard code a set delivery method. If there are fields in the ERP that decides which delivery method the order gets, it will automatically be chosen on the terminal.
Example query towards Visma Business. Queries can be adjusted or added to several columns, retrieve data and so on depending on the customers own preferences to these fields, as long as Consignor accepts the addresses and so on.
Visma Busines: Picking -> Pickinglist

select
     ...
     act.custno customerno,
     act.nm delname,
     act.ad1 deladdress,
     act.ad2 deladdress2,
     act.pno delpostcode,
     act.parea delcity,
     'NO' delcountry,
     act.mailad delmail,
     act.phone delphone,
     ...
from
     ...
Setup - Consignor
Location, Actor and Carriers
Press Setup, choose the correct Location or Actor. Here we used Location for Export/Import Setup. In your case Actor may be a more correct option. Make sure to check for this: carrier (i.ex. Bring/Schenker) → subcarrier (i.ex. Packages/Part loads/Groupage) → product (i.ex. Business parcel/Businness parcel express over night/Door delivery, Part load/Groupage). This must be set up per delivery method – "product" will be the delivery method option on the terminal.

Import Setup
See the added files, download these first.
ImportMapping.ini
List Files > Add
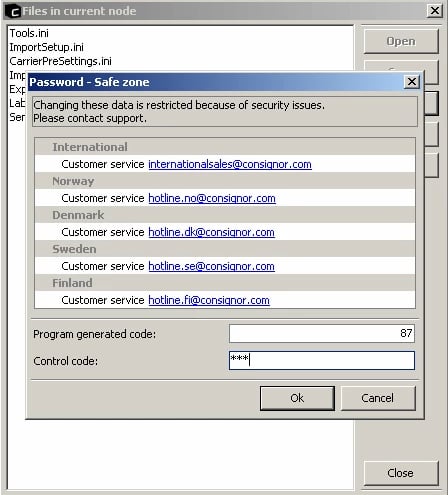
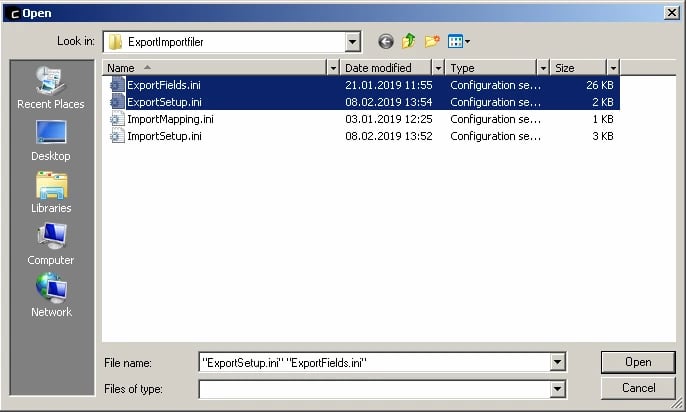
Right click in the big white field to the right of the location/actor picker → List files... → Add → type in the Consignor control code → OK → Choose added import.ini filer → Open → If a pop up window asking to overwrite already existing files shows up, press Yes → Close. All OK.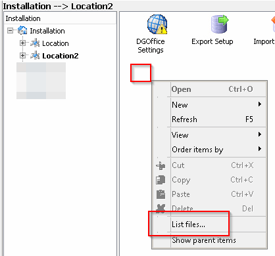
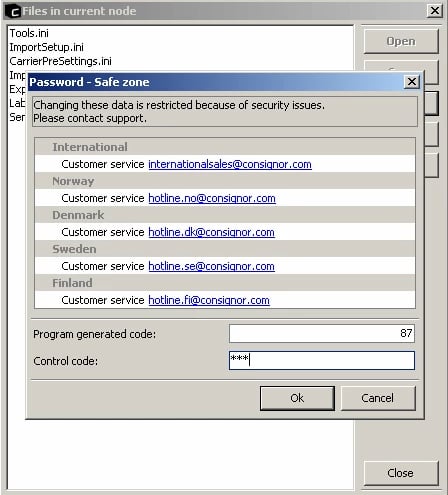
Note! When doing this you should also add the ExportFields.ini and ExportSetup.ini files, as you will eliminate having to do this at a later time (Image does not illustrate this, but the intention is for all four files to be added).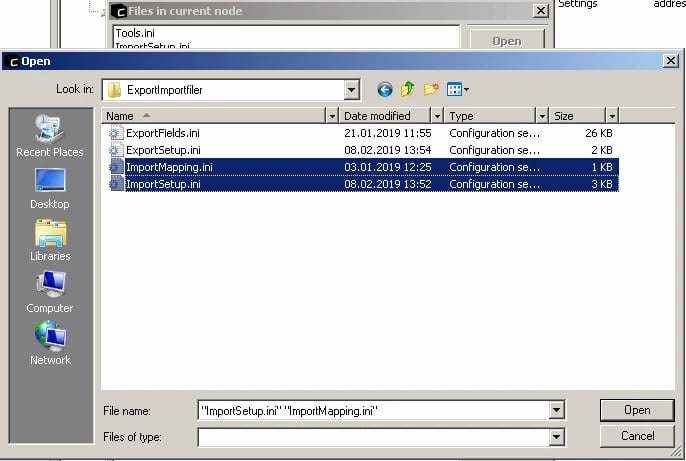
Import > Import Source
Right click Import Setup → Open, choose the Import Source tab. Make sure the Import Active is active. In our standard setup, the necessary folders are arranged like this:
C:\BxSoftware\Consignor\import\added. You can choose to place this somewhere else as long as the import and added folders are where they are meant to be. Move to folder should always be the added folder. Make sure these folders are created before/after the setup.

Import > Import Setup
The Import Setup tab looks like this. The Ini files may be updated with a newer standard/more fields as we might find it necessary to add more standard fields. Press Fields -> Append -> Field if you need to add more fields that are not already in our standard setup.\

Import > Carrier PreSettings
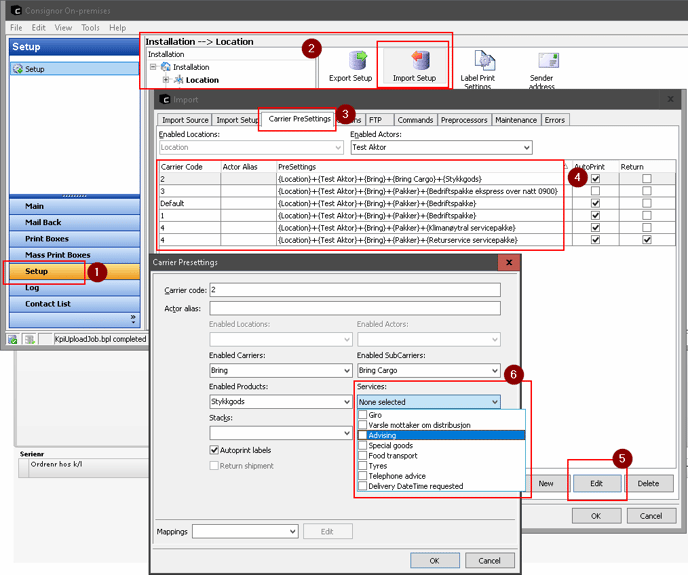
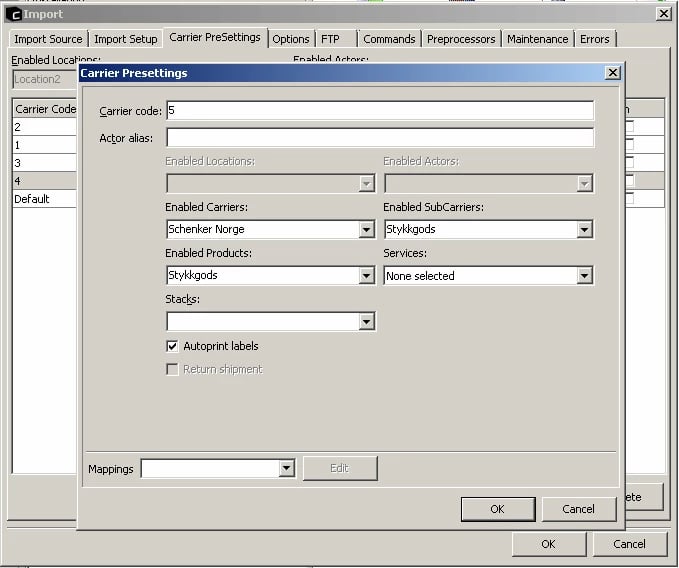
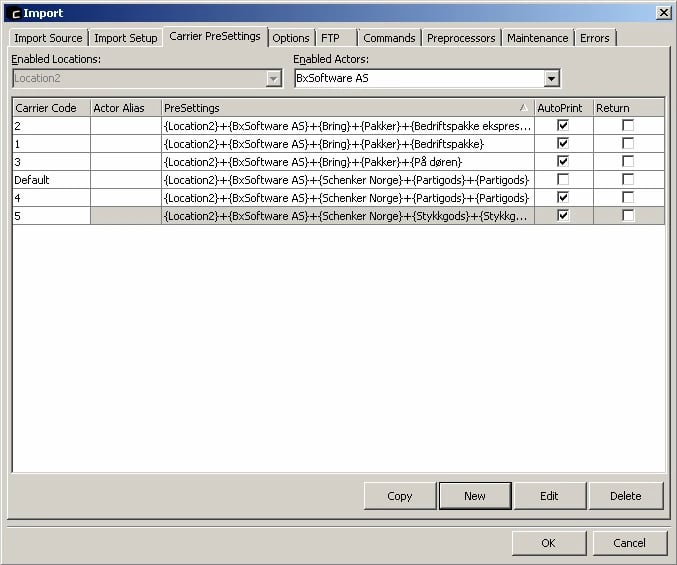
In the Carrier PreSettings tab you add the different delivery methods that is going to be available on the handheld terminal. Here we have added the various Bring and Schenker setups from Location, Actor and Carriers. Here you choose only the carriers that are to be available on the handheld terminal. Press New, add Carrier code, Enabled Carriers, Enabled SubCarriers, Enabled Products and activate Autoprint labels → OK. Press OK again to save/close the page.
You can retrieve the Carrier code from BxAdmin → SQL integration → DeliveryMethods query → deliverymethod table (run a query to see results), or check the ERP version of delivery methods.
See information on how delivery methods in the different ERP's can be created/where to find them:
Visma.net delivery methods
Visma Business delivery methods - coming soon
Visma Global delivery methods - coming soon
Uni Økonomi delivery methods - coming soon
Export Setup
The Export setup is only added if there is a need to report back price and/or tracking information.
See added files, and download these. They are added the same way as the Import Setup files.
List Files > Add
If the export files was added to the setup during the Import setup, you may skip this step.
Right click in the white field → List files... → Add → type Consignor control code → OK → Choose added export.ini filer → Open → If a pop up window asking to overwrite already existing files shows up, press Yes → Close. All OK.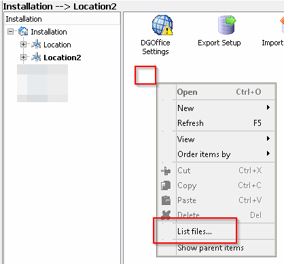
Export > General
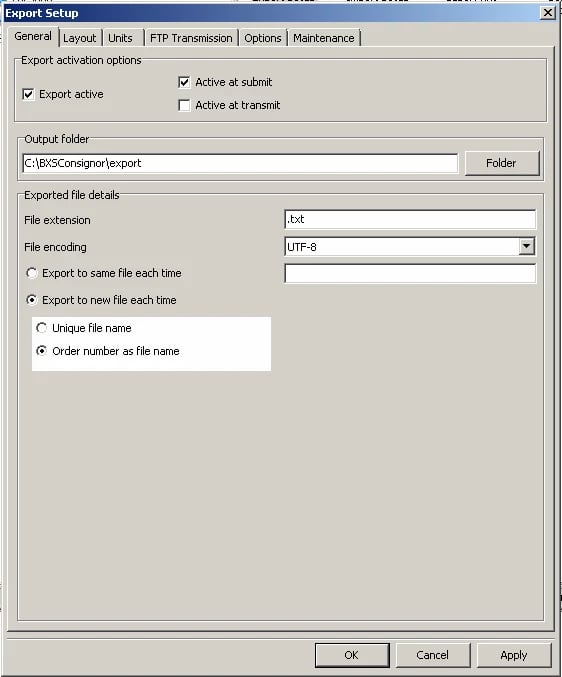
Right click Export Setup → Open. In the General tab, Export active and Active at submit must be on. Make sure that the file path is correct. Our standard file path setup is: C:\BxSoftware\Consignor\export (Image is not updated and contains an old file path).
Setup - Terminals
See Setup - BxAdmin first.
After the setup has been adjusted in BxAdmin, press Setup → Settings in BxMobile or F9 key on the terminal to download settings.
Setup - ERP specific
Visma Global
Visma Business
Visma.net
Tracking number
Uni Micro
Setup - Miscellaneous
Package type - pallet, half pallet, box, bundle, crate, carton etc.
In some cases it might be preferable to choose between different package types from the handheld terminal like for example pallet or half pallet per shipment or per unit/piece. To set this up, different setups are required in BxAdmin and Consignor. The Data module in BxAdmin must also be available. If not visible in BxAdmin when you sign in, BxEngine needs to be updated to the final version.
BxAdmin - Data
Start with Data i BxAdmin, under the PackageTypes tab.
PackageType = The value we send to Consignor and set up in the Alias field in GoodsTypes per delivery method in Consignor. This ID can be whatever you choose as long as it is coherent with the ID setup in Consignor.
PackageTypeName = Name of the package type one chooses in BxMobile.
DeliveryMethod = The ID of the delivery method added to the ERP system, typically Visma Business = txtno, Visma.net = shipVia ID, Uni Micro = id from LST_Transportmaate.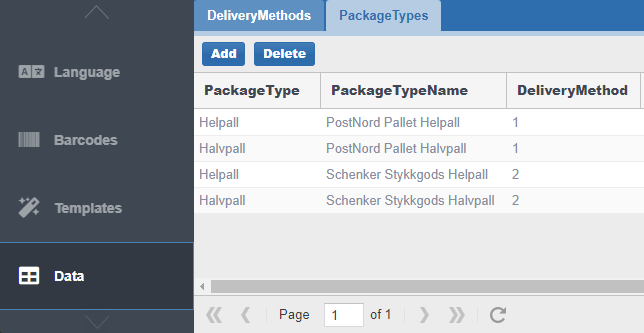
BxAdmin - SQL Integration
Change the Package Types query under SQL Integration -> Picking so it is coherent with the DeliveryMethod ID from the ERP system. Remember to save the query after the applied change.
If it is towards Visma.net the standard query is normally sufficient enough.
Towards Visma Business and Uni Micro we need to merge the adjoined ERP tables.
Example query towards Visma Business with the correct results. Here line 2 and 8 are replaced with hhv 3 and 9 + 10, 11 and 12 (t.txttp = 5 and t.lang = 47 is necessary to avoid duplicates).
select
--    d.deliverymethod,
    t.txtno deliverymethod,
    p.packagetype,
    p.packagetypename
from
    BxEngine16128.dbo.packagetype p
--    left join deliverymethod d on d.carrier = p.carrier and p.product = d.product
    left join txt t on t.txtno = p.deliverymethod
where
    t.txttp = 5
    and t.lang = 47

Example query towards Uni Micro, here line 2 and 8 is replaced with line 3 and 9.
select
--    d.deliverymethod,
    t.id deliverymethod,
    p.packagetype,
    p.packagetypename
from
    BxEngine.dbo.packagetype p
--    left join deliverymethod d on d.carrier = p.carrier and p.product = d.product
    left join LST_Transportmaate t on t.id = p.deliverymethod

BxAdmin - Export to ERP
A new mapping in the Consignor exporter must also be added. The SourceField column should contain package type, which is the column name we retrieve and send information from/to. Our starting point is that there are only standard fields in the exporter and our standard setup in Consignor, so in this case we add 21 (for the F22 field in Consignor Import Setup)to Destination, this is the placing that the package type receives in the file sent to Consignor.
BxAdmin - Configuration - Client Profiles - Area: pickinglist
In Area: pickinglist these parameters must be activated:
downloadpackagetypes = true
showpackagetype = true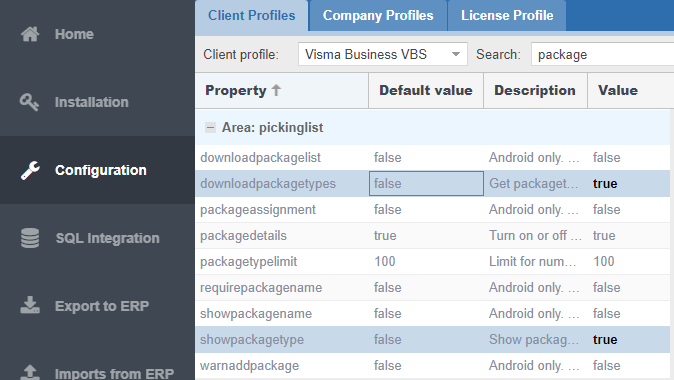
Retrieve settings and data to the handheld terminals after this has been completed.
Consignor - Setup - Goods Types
Find the correct delivery method within Consignor. In this case we need package types for a PostNord Pallet. If various package types are already in use when working manually in Consignor, the Goods Types option should already exist, but if not - right click the white field on the right of the delivery method and add the Goods Types option. If the Good Types option already exists, double click to open.
After Goods Types has been added/opened a dialogue with the different package types should appear. In this case we choose PE Pallet and AF Half pallet and move to the Enabled goods types field to the right. Press OK when finished. 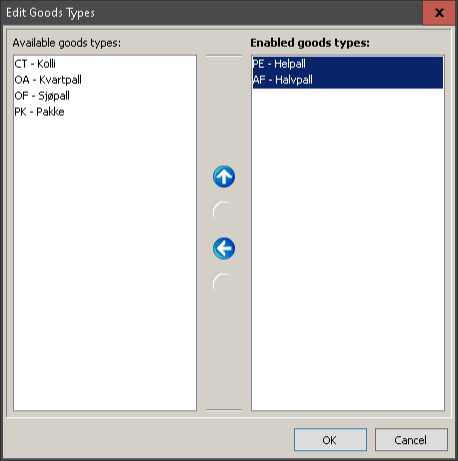
Consignor - Setup - Import Setup
Next step is to edit the delivery method in the Import Setup. Find the Import Setup that belongs to the delivery method you just added the package types for and open. In this case it is located under our Location2.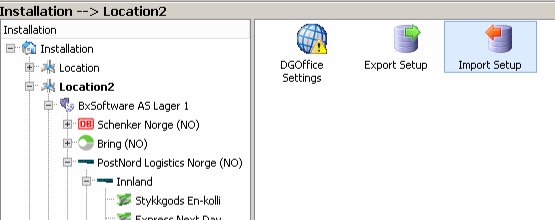
In the Import Setup, open the Carrier PreSettings tab (1), then press New or delivery method -> Edit to set up a new or edit the existing delivery method (2). In this case we are creating a new one (2). Add the correct Carrier code (3), Carrier, SubCarrier and Product (4). Then choose the Goods Types mapping and Edit (5).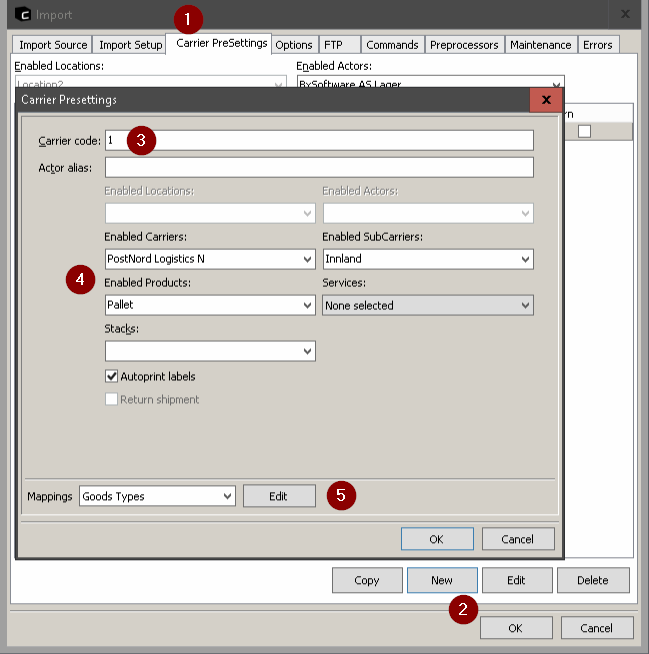
Press Add. In the Alias field the package type ID is added from BxAdmin - Data - PackageTypes -> PackageType. And then the correct Type is chosen. Press OK. Do the same for other delivery methods that has package types added for them. 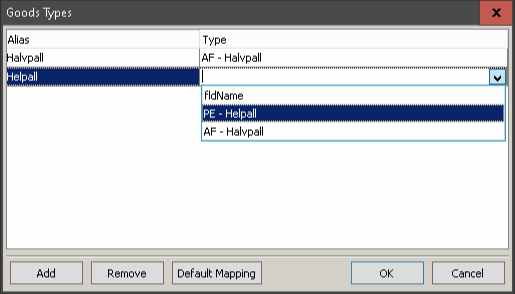
In the final step the correct Import Setup fields are added. As a standard in BxSoftware's Import Setup, there are two extra vacant Fields - F21 and F22 with Shipment Field Unknown. In this case we use F21 (destination 20 in BxAdmin export), and add GoodType ->Line. Press OK when finished.
When this is all done it is time to test picking an order from BxMobile. Remember to retrieve settings and data after all the setup has been completed.
The Package Type options on a handheld terminal looks like this: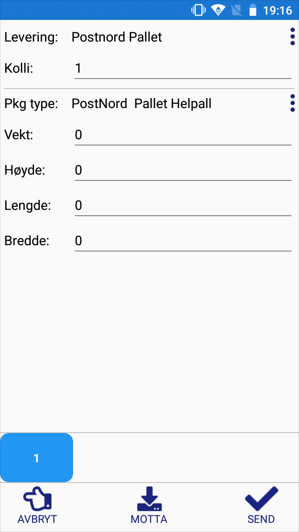
The file sent to Consignor must contain the package type ID at the end of the file.
Service on freight - SMS notifications etc.
This setup depends on what you normally do in Consignor. We currently do not support choosing services from the terminal, so if specific services are to be added, as for example SMS notifications or other types of services, this must be added to the delivery method itself that is being mapped under Setup -> Import Setup -> Carrier PreSettings -> Edit on the preferred delivery method. 