
Are you using a cloud based ERP system such as VismaNet, Business Nxt, Business Central, Tripletex, etc.? You can skip this article and go directly to Part 2. The installation of BxEngine is only relevant for On-Prem systems such as Visma Business, Visma Global, SAP Business One, Multicase, Uni Økonomi V3, etc.
Installation of BxLogistics, BxSales and BxLabels can be divided into several areas:
- Installation of BxEngine and BxSmartPrintPro services on the server, which are the main components of the Bx solution.
- Setting up integration with ERP in BxAdmin and connecting to terminals with BxMobile and/or conecting printers in BxSmartPrintPro.
Installation steps:
- Part 1 - BxEngine - Installation of BxEngine (this article).
- Part 2 - BxAdmin - Setup in BxAdmin
- Part 3 - BxMobile - Installation of handheld terminals (can be done independently of Parts 1 and 2).
- Part 4 - Pairing BxMobile - Pairing handheld terminals/BxMobile (dependent on Parts 1-3).
- Part 5 - BxSmartPrintPro - Can be installed independently of Parts 1-4.
If you are looking for instructions on migrating an existing BxLogistics/BxEngine installation, you can find them here.
If you need to install an additional BxEngine service on the same server, instructions can be found here.
BxEngine Installation Requirements
BxEngine must be installed on a Windows server or PC. The database requires Microsoft SQL Server (SQL Express/Standard, etc.), and the BxEngine service requires .NET Framework 4.8.
What you need for Part 1:
- Download from our partner portal: https://partner.bxsoftware.no/
- Requires login. If you do not have an account, contact support@bxsoftware.no to create a user account (if you are a registered reseller of our solutions).
Steps:
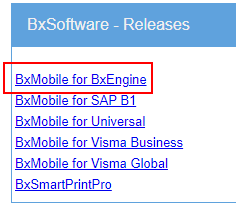
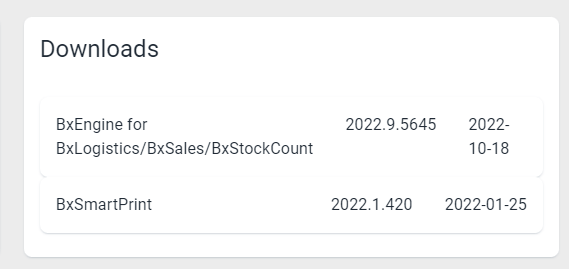
- Open Home and find Downloads in the top-right corner.
- Download "BxEngine for BxLogistics/BxSales/BxStockCount" from the Releases section.
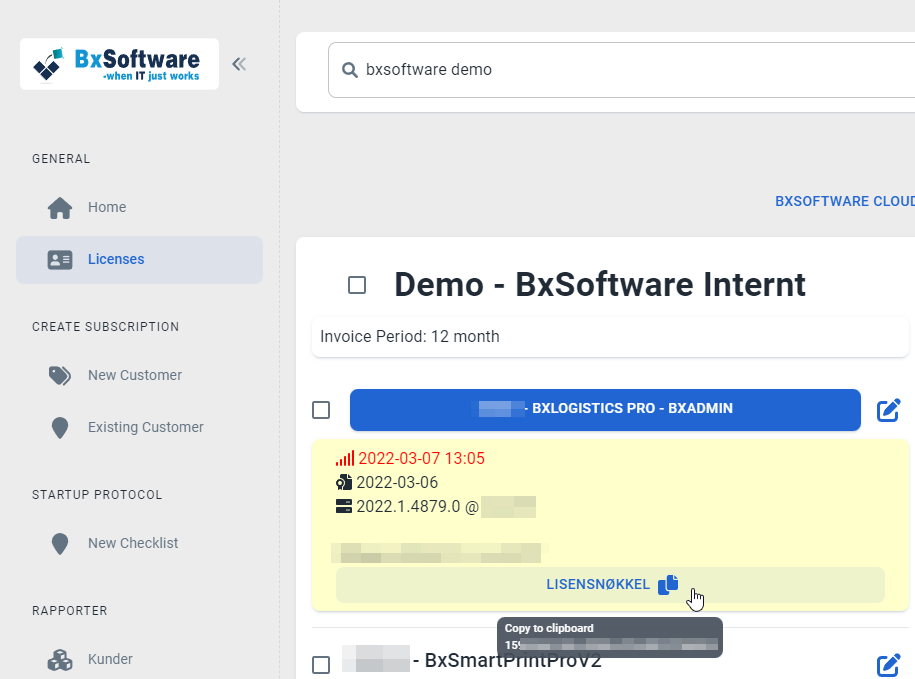
License Key for BxEngine
- Find the license key under Licenses in the portral.
- Search for the customer, then click the license key button to copy the key.
Admin Access on the Application Server
BxEngine is usually installed on the same server as the ERP solution's application server, but it can also be installed elsewhere, depending on the ERP system.
Examples:
- Visma Global: Requires access to SDK/API; therefore, it is almost always installed on the Visma Global app server.
-
Visma Business: Needs access to the EDI area, either on the same machine or via UNC/network path. If using VBS instead of EDI, access to the VBS installation directory is required.
- SAP Business One (SAP B1): If BxEngine is installed on a different server than the SAP server, SQL Server Native Tools 20xx and SAP DI API SDK must be installed.
- Uni Økonomi V3: Must be installed on the same server as the Uni Import Service, usually the Uni Økonomi server.
If using a UNC path to EDI or VBS directories, a service user must be configured with the necessary access rights for BxEngine.
Admin Access on SQL Server
- Full admin access is not strictly required, but you need permission to create a SQL database and a SQL user.
Firewall/Port Openings
- Typically, port 443 (outbound) is required - More information is available here.
Creating SQL Database and User
BxEngine requires its own database to store configuration data, logs, and operational data such as inventory counts.
Since BxEngine often retrieves data from the ERP database, it will need read access to that database.
BxEngine Database Setup
-
Create a new SQL database (e.g.,
BxEngine).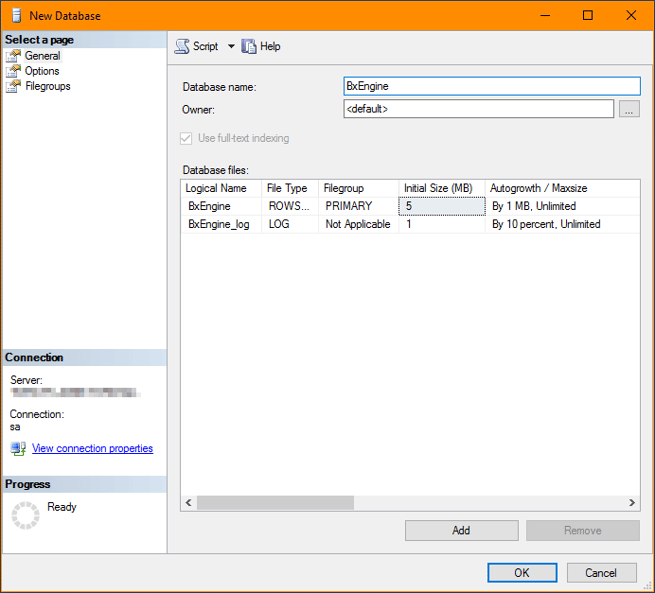
-
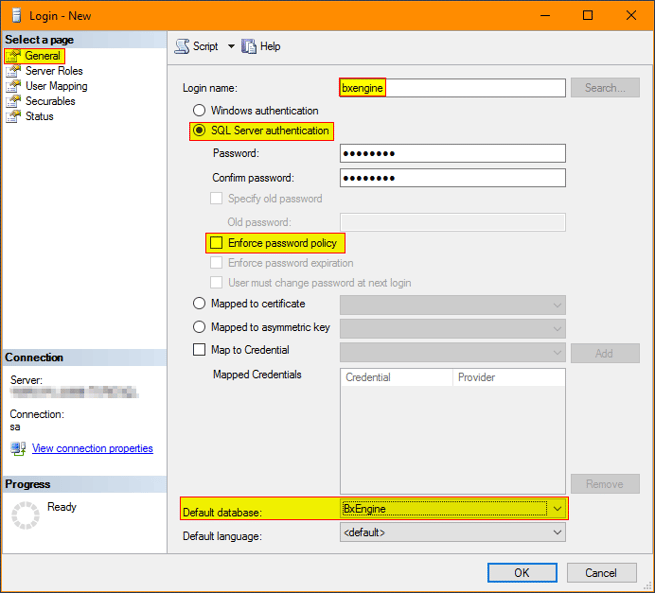
Create a new SQL login for BxEngine:
-
Use SQL Server authentication.
-
Disable "Enforce password policy" (to prevent password expiration issues).
-
Set default database to the newly created BxEngine database.
-
Assign Permissions:
-
BxEngine database:
-
db_owner(to allow database structure changes during upgrades).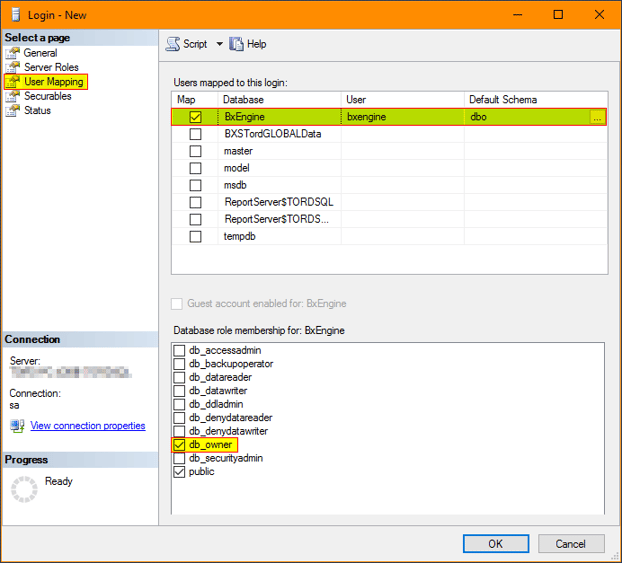
-
-
ERP database:
-
db_datareader(for reading ERP data). -
db_datawriter(if integrating with Uni Micro ERP).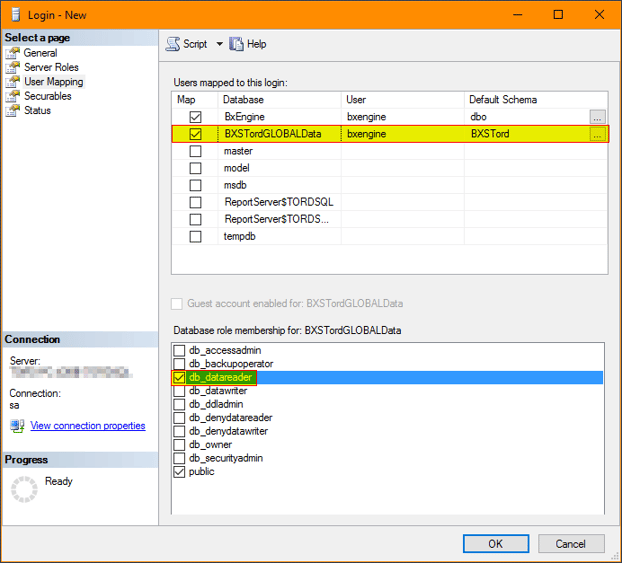
-
If installing on an ASP provider’s shared database instance, follow their naming convention (e.g., CustomerName_BxEngine_Prod).
Note: The BxEngine database does not have to be on the same SQL server as the ERP database.
Installation
-
Run the BxEngine.msi file you downloaded earlier.
-
Follow the setup wizard:
-
Click Next → Choose an installation folder → Click Next → Click Finish.
-
-
After installation, start BxEngine Monitor from the desktop shortcut. (It may take some time to start on some servers/PCs.)
-
When BxEngine Monitor opens, a Setup Box will appear asking for:
-
License Key: Retrieve from partner portal → Licenses.
-
SQL Server: Enter
ServerName\Instance,Port(if not using default port 1433). -
Database: Select the BxEngine database (not the ERP database).
-
User: Enter the SQL user you created (
bxengine). -
Password: Enter the SQL user’s password.
-
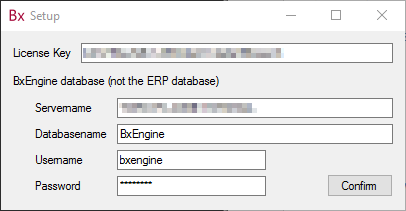
⚠ Important:
-
The bxengine user must have db_owner rights on the BxEngine database during installation and operation.
-
Do not enter the ERP database here—use only the BxEngine database.
-
Use a strong password for the SQL user.
-
Windows Authentication is not supported—a SQL user is required.
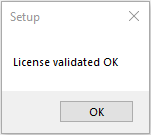
Database Initialization
-
After entering the database details, click Confirm.
-
If you encounter issues, verify:
-
Username/password
-
SQL server connection settings
-
Starting and Changing the Service User
-
Once the database is set up, BxEngine Monitor will show a status screen and start the Windows service.
-
If BxEngine needs network drive access, restart the service and assign a service user with the required permissions.

Next Step: Setting up BxAdmin
BxLogistics Installation Part 2 - BxAdmin
⚠ Troubleshooting:
If you get a 404 error when logging into Bxdmin:
- Stop the BxEngine service.
- Restart it and wait about 30 seconds.
- Try logging in again.