Unifaun Online integration
Setup and configuration of Unifaun Online integration with BxLogistics Pro
In this guide we will mostly look at how the integration works with Visma Business, but many of the same principles will still apply for other ERP systems as well. Typical Cloud ERP's, such as Visma.net gives the advantage of being able to skip a few steps by not having to add extra database connections and SQL queries towards different databases in BxAdmin because both ERP and Unifaun uses the same database for data - BxEngine.
1. Preparations
Printers
Make sure that the label printer and other A4 printers that are tasked with Unifaun print outs are installed on a server available for the BxEngine service (in other words print queues on the same server as BxEngine). If print queue isn't available for installation on the BxEngine server (i.e. because of limitations on connection or with ASP), there is an option to install BxSmartPrintPro as a print proxy for example on a warehouse PC or a local server where installation of label printers are easier.
We recommend installing print queue locally on the Bx server/Computer rather than shared from a print server because it is both more stabile and the print outs are quicker.
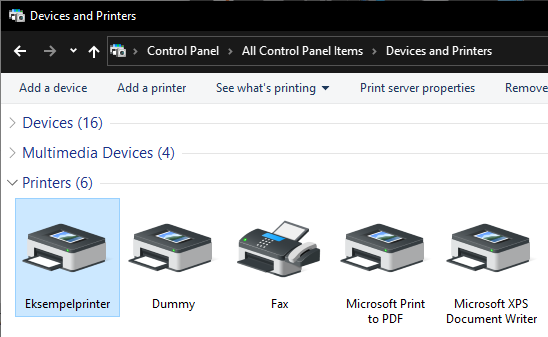
What we mean by local print queue is that you will find it under Control Panel -> Devices and Printers -> and something called "Printer" instead of "Printer on servername" or "\\servername\Printer". And it should look something like this:
If you still choose to use a shared printer from printserver or something similiar, it is very important that the printer is available for our BxEngine and/or BxSmartPrintPro services. Local System which is a standard service user for these two facilities often lack the admissions for shared network printers. The printer name must also be added with the UNC path in our setup in BxAdmin - i.e. "\\servername\Printername".
Printers that contains (Redirected) will not work because these are printers carried over via RDP or Citrix sessions, which means that as soon at the session closes, the print queue disappears.
Unifaun
The setup in Unifaun that contains transport arrangement, freight companies etc. must also be completed. You or Unifaun will have to make sure that this is all in order. BxSoftware will not be responsible for this setup. To integrate with Unifaun Online it is necessary that you have a login account for Unifaun Online - https://www.unifaunonline.com/
ERP system
All methods of shipment must be entered into the ERP system. You must enter one method per product delivery within Unifaun that you wish to apply from the handheld scanners.Some examples of this can be:
- Bring Express next day delivery
- Bring Business parcel
- Bring Business partload
- Bring Parcel delivered home
- Bring PickUp parcel
- Schenker partload
All of the above needs to have one delivery method per product registered in the ERP system. We also recommend adding a "Pick up" alternative or similar that can be used to ship the order without ordering shipment via Unifaun.
Examples of how the product delivery is added:
- Visma.net: Delivery methods Visma.net
- Visma Business: Coming soon
- Visma Global: Coming soon
- Uni Micro: Coming soon
- Other ERP's: Coming soon
2. Unifaun
To integrate with Unifaun Online it is required that you have a login account to Unifaun Online. https://www.unifaunonline.com/
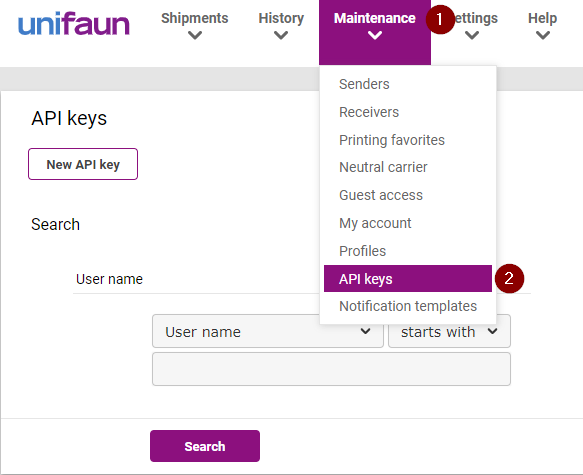
Log onto https://unifaunonline.com/ and open Maintenance -> API keys
- When you press Search you will get a search result for different ID's/keys created earlier if an API key has already been set up. Press View to overview the entire API key which is to be extracted and entered into our setup. It is the combined ID that must be copied out. Make sure that the API key is for the Web Services (REST) API, as our integration is based on the Unifaun REST API. Proceed to step 3 if you don't already have a key and need to create one. Move forward to the BxAdmin part of the documentation when the API key is extracted.


- If you don't have an API key already or wish to have a separate key for BxSoftware, you can create a new one with "New API Key". Make sure that the status is Enabled, that it's for Web Services (REST), and that Developer ID is filled out - this will be the user ID used to log on to Unifaun. Press Save. You should now have recieved an API key that you can extract the same way as explained in step 1 and 2.


3. BxAdmin
Installation
Under "Installation" in BxAdmin you need to add an extra Database connection. This will be the BxEngine database as the BxEngine database is the one used to download data to and from Unifaun. If the set up is to be towards Visma.net or other cloud based ERP's, nothing is needed as BxEngine most likely already exists.

Imports from ERP
- Create new import for Unifaun found under the "Imports from ERP" category.
Import type=unifaun
Module=deliverymethods
Enabled=check
- Under Field mapping, press "Add missing defaults" to add all the import parameters.

- Under Import config, press "Add missing defaults" to add the configuration parameters.
a. Make sure to add the correct value in dbconnection - which in this case is 2 - from step 1. Installation, BxEngine will be the second database connection that is added after Visma Business. If it's to be setup towards Visma.net or other cloud ERP's, it's mostly enough to leave it on dbconnection 1 (standard). If you run BxCloud dbconnection needs to be set to 0.
b. Under serverkey, add the API key that was extracted from Unifaun.
Export to ERP
- We will also add an exporter for Unifaun under "Export to ERP".
Export type=unifaun
Module=unifaun
Action=create
Enabled=check

- Under Field mapping, press "Add missing defaults" to add the export parameters.

Configuration
- Under configuration -> Client profile -> Choose the correct profile: Activate these parameters under Area: consignor
- enabled = true
- serverkey = API key from Unifaun
- shipmentlabelprinter = Name of the print queue as it is available for BxEngine
- unifaun = true
- url= https://api.unifaun.com/rs-extapi/v1/shipments?returnFile=true

- Under Area: pickinglist, activate these parameters
deliverymethod = true
shipment = true - If printproxy setup is used, follow these checkpoints:
Under Area: pickinglist, fill out the printproxy containing the BxSmartPrintPro license code, printproxylicensekey will be filled out with the license key to BxSmartPrintPro.
If print proxy setup isn't relevant, you may skip to the next step.
a. printproxy=companycode/AppCode
b. printproxylicensekey=license key
Data
Open Data in BxAdmin and click Run Import to download the delivery methods from Unifaun. Wait for a few minutes before trying to refresh as it may take some time to download them all. When the dowload is complete, the list should look like this

Connections towards the delivery method is done by filling out the "DeliveryMethod" column with the value of the delivery method in the ERP system. In this case, from Visma Business, it will be txtno from the txt table where txttp = 5. Here we have added 4 different Bring options. 
The next and last step of the setup is to add the SQL query correctly so that we can attach our Data table and the ERP systems data.
SQL Integration
You can find the inquiry for delivery methods under SQL Integration -> Picking -> Delivery Methods, and it should look something like this to achieve standard functionality. Here, you can also add more where filters i.e. to get language and/or only the delivery methods you wish to get. Notice that the query mainly goes towards the Visma Business database, where BxEngine is left joined in the query. Also notice that we have modified 5 to 0 because it, in our data, is a "Self pick up" option, and that everything that is converted to a 0 will not be sent to Unifaun. Externalserviceid is used to add extra services like email/text notifications etc. - We will address this later in a separate step under 4. Extra Setup
Also check the Package Types query and make sure that it is the BxEngine database that is connected as this query is exclusive for the BxEngine database. Package Types is used to ship with the package type value, and this won't always automatically get activated in the setup. A more detailed description of what this is used for will be added in a separate step under 4. Extra Setup
Now, all the necessary main setup should be completed to make the Unifaun integration work. When all the steps above are completed, you only need to retrieve settings and data to the handheld terminals to access the setup.
1. Retrieve settings
2. Recieve data
4. Extra setup
Package contents
In some cases of specific freight vendors, additional information is required, such as package content on the print out itself. In most cases adding a static value note to the package that explains the contents, i.e. "Spare parts car" will be enough.
If it happens to differentiate from time to time, you can extract necessary information from the ERP in SQL Integration -> Picking -> Pickinglist, give the new column in the query a relevant name such as "delcontents" (partial content), copy the code from the field area beneath, and then paste in Export to ERP -> unifaun -> under Field mapping.
If a specific value on each package that is sent is enough, you can copy the code from Field mapping -> set value
Field mapping -> variable value
[{"export":11,"sourcefield":"delcontents","destination":"shipment.goodsDescription","static":"","ignorezero":false,"maxlength":null,"forceset":false,"ignorefailure":false,"enabled":true,"isprimarykey":false,"importoneline":false,"isforeignkeyto":"","sequence":null,"destinationrow":"","paddingcharacter":null,"readonly":false,"required":"","returnmapping":false,"destinationtype":"","comment":null,"id":124},{"export":11,"sourcefield":"delcontents","destination":"shipment.parcels[].contents","static":"","ignorezero":false,"maxlength":null,"forceset":false,"ignorefailure":false,"enabled":true,"isprimarykey":false,"importoneline":false,"isforeignkeyto":"","sequence":null,"destinationrow":"","paddingcharacter":null,"readonly":false,"required":"","returnmapping":false,"destinationtype":"","comment":null,"id":125}]
It should then look something like this
Field mapping -> set value
[{"export":11,"sourcefield":"","destination":"shipment.goodsDescription","static":"eksempeltekst fast verdi","ignorezero":false,"maxlength":null,"forceset":false,"ignorefailure":false,"enabled":true,"isprimarykey":false,"importoneline":false,"isforeignkeyto":"","sequence":null,"destinationrow":"","paddingcharacter":null,"readonly":false,"required":"","returnmapping":false,"destinationtype":"","comment":null,"id":124},{"export":11,"sourcefield":"","destination":"shipment.parcels[].contents","static":"eksempeltekst fast verdi","ignorezero":false,"maxlength":null,"forceset":false,"ignorefailure":false,"enabled":true,"isprimarykey":false,"importoneline":false,"isforeignkeyto":"","sequence":null,"destinationrow":"","paddingcharacter":null,"readonly":false,"required":"","returnmapping":false,"destinationtype":"","comment":null,"id":125}]
It should then look something like this
Extra services
Services towards Unifaun must be built as a json object for us to be able to send necessary information back to Unifaun. This must be added under Data -> DeliveryMethods in BxAdmin, in the Services column, and/or one of the available Inf columns. You must then log in to Unifaun and open Help -> Code Lists -> Services (ERP-connection XML) -> Show. You will then see a list of carrier-products/delivery methods. Press View ![]() to open the overview of services and add ons for the specific delivery method you wish to set up service/add on for.
to open the overview of services and add ons for the specific delivery method you wish to set up service/add on for.
Additional services and add ons/Unifaun/nShift options:
Additional services (Tilläggstjänster/tillval)
Use externalserviceid in DeliveryMethods inquiry. Fill out Services in Data - i.e. towards DB Schenker:
[{"id": "NOT", "text4": "#delmail#"}]
Unifaun/nShift options (nShift allmänna tillval)
Use cfg_shipmentoptions in DeliveryMethods inquiry. Fill out Inf1 (or other inf fields if inf1 isn't available) in Data - i.e. towards DB Schenker:
[{"id": "ENOT", "from": "avsenderepost@mail.com", "to": "#delmail#"}] -
